CLEANING AND LUBRICATING
17. CLEANING.
a. Watches and clocks like other mechanical instruments require
cleaning to insure the efficiency and accuracy that is expected of
them. They require cleaning for two reasons: (1) dust has entered
the case, settling on the moving parts, and (2) oil has dried causing
pivots to become gummy, which causes wear on parts and lack of
power in the train. When a timepiece becomes dirty it will show an
erratic rate and become worse each day until the condition is so bad
that it will cease functioning entirely.
b.
There are two methods used in cleaning ordnance timepieces:
the machine method, and the hand method. Cleaning with a watch
cleaning machine is preferable to the hand method as it is faster and
simpler but, when using it, the proper method must be followed with
precautions. There are special manufactured solutions made by the
manufacturer especially for use with the cleaning machine, and only
these must be used. When cleaning by the hand method, a combina-
tion of the following ingredients can be used satisfactorily: mild soap
and water, ammonia, and alcohol, followed by at least two separate
rinses of benzene or gasoline containing no tetraethyl lead. One
possible combination of the cleaner is listed for reference, the mate-
rials of which are available in any operational theater.
1 gallon boiling water
2 ounces soap (mild castile preferred) (by weight)
6 ounces ammonia (26 percent solution preferred)
12 ounces alcohol
c. When the watch cleaning machine is used, the heavier parts
such as the plate and bridges are placed in one compartment of the
cleaning basket, and the train wheels, winding and setting parts, dial
train, pallet, and all other smaller parts in another compartment, with
the balance assembly by itself. The basket is attached firmly to the
rotating spindle of the motor and lowered to immerse in the cleaning
solution contained in jar No. 1, allowing it to rotate there for 2 min-
utes only. The basket is then raised slightly above the solution and
slowly rotated to expel excessive solution for 20 or 30 seconds. The
same process is repeated in the Nos. 2 and 3 jars containing rinsing
solution, after which the basket is revolved above the drying coils for
2 minutes. With the drying completed, unfasten the basket and care-
fully remove the parts. Sharpen a piece of pegwood and run the
point in the jewel holes. This will remove any foreign particles that
have not been removed by the cleaning machine. Also rub the cap
jewels thoroughly to make sure they are clean. Press all pivots into
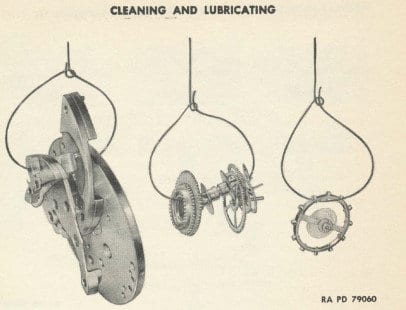
Figure 23 — Watch Parts Strung on Dip Wires for Cleaning
a piece of pith to remove any gummy oil, etc. The movement is now
ready for assembly.
d.
When cleaning by the hand method the parts are strung on dip
wires (fig. 23). Remove all cap jewels and string the plate, bridges, bal-
ance cock, setting levers, and other large parts on one dip wire. String
the train wheels, dial train wheels, clutch, winding pinion, crown, and
ratchet wheel on another wire, and the balance assembly on a wire by
itself. Allow these parts to soak in the rinsing solution about 10 min-
utes and then remove and allow to dry. Dip the parts into the clean-
ing solution; the larger parts should be brushed vigorously with a
medium stiff brush, and the smaller parts swished in the solution a
few minutes. Rinse all parts through two rinsing solutions and re-
move parts from dip wires onto sheets of watchmaker’s no-lint paper
and allow to dry. After drying, peg all holes, hole jewels, and cap
jewels, and pith the pivots and pinions. The movement is then ready
for assembly.
e.
A porcelain dial may be cleaned with cloth dampened with
soap and water. Blued steel hands can be cleaned the same as all
other parts. Dials and hands coated with a radium substance must
not be cleaned with a solution of any kind, but simply dusted off with
a soft brush.
LUBRICATION.
a.
General. The primary reason for oiling a watch is to re-
duce friction and wear between moving surfaces. This reduction
saves power and makes for smoother operation. The importance of
cleaning and thoroughly oiling a watch yearly cannot be emphasized
too greatly.
b.
Oiling Capped Jewels. To place oil in a capped jewel, a
small drop should be placed on the oiler and fed into the space between
the jewel and the end stone with a fine pointed wire or broach
smaller than the jewel hole. The size of the oil bubble should then be
examined and increased to its proper proportions by adding a little
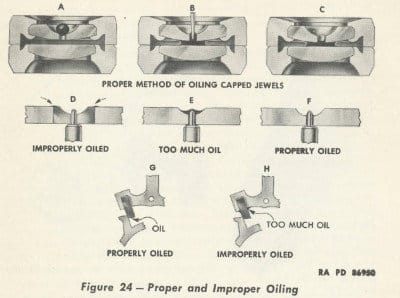
at a time (fig. 24).
c.
Proper Method of Oiling. Figure 24 shows a drop of oil
after it has been placed in the jewel cup. During this operation care
should be taken not to strike the brass setting with the oiler as it may
cause the oil to run away from the bearing. B, figure 24, shows the
oil being pushed through the jewel hole to the end stone by a fine
wire or broach which must be smaller in diameter than the jewel hole.
C, figure 24, shows oil in place. Note the quantity of oil. There is
sufficient oil to lubricate the bearing, but not so much that the oil will
contact the settings. Overoiling a bearing is as harmful as under-
oiling.
d.
Oiling Train Jewels. After the movement has been assem-
bled, oil should be placed in each of the train jewels or bushings. In
oiling, the oiler should touch the pivot and the bottom of the oil cup
simultaneously, so that the oil flows through the jewel hole to the
pivot shoulder immediately. When removing the oiler from the oil
cup, lift it straight up so that any possibility of leaving a track of oil
across the top surface of the jewel to the setting is eliminated. This
condition would tend to draw oil out of the cup onto the setting as
shown in D, figure 24. When oiling the center lower jewel, a small
quantity of oil should be placed on the center wheel arbor so that the
cannon pinion will be properly lubricated during setting. To avoid
putting too much oil on the center wheel arbor, apply with an oil-
saturated piece of pegwood. E, figure 24, shows how excessive oiling
will cause the oil to flow through, and adhere to, arbors and pinions
and will travel through the movement. If oil gets on the hairspring,
it causes erratic timing. F, figure 24, shows a properly oiled pivot.
Oil has run directly through the jewel hole to pivot shoulder, retaining
the proper amount of oil on the bearing surfaces.
e.
Oiling Pallet Stones.
An approved method of oiling the
pallet stones is to apply the oil to three teeth of the escape wheel
rather than to the pallet stones themselves. As the escape wheel
rotates, an even coverage of oil will be distributed upon all the teeth
of the wheel and to the face of the pallet stones (fig. 24).
f.
Oiling Winding and Setting Mechanism.
After cleaning
and winding the mainspring, a small amount of oil should be placed
in the barrel to lubricate every part of the spring. Apply a small
amount of oil to the shoulders of the barrel arbor before inserting it
into the barrel. An excessive amount of oil in the barrel will be forced
out when the mainspring is wound tightly. All the bearing surfaces
in the winding and setting mechanism should be oiled, including the
square of the winding arbor, where it runs through the clutch wheel.
In the case of a pocket watch, the leaves of the sleeve in the pendant
should be oiled in order to lubricate the shoulders of the winding
arbor. Never lubricate the setting wheels or the minute and hour
wheels or the teeth or pinions of third and fourth wheels.
g.
Use Clean Oil. Watch moving parts are subject to a cer-
tain amount of wear under normal conditions, but if the watch is im-
properly oiled, wear will occur more rapidly and the watch will fail
to keep time accurately. It is essential that clean oil be used because
abrasives in the form of dirt or dust find their way into the oil. The
main supply of oil should be kept away from dirt and light, and
should be protected from air and contamination as much as possible.
h.
Oiling Interval.
For best performance, a timepiece must
be cleaned, oiled and regulated once each year.
